
It’s great to see you! This Quick Start Guide will show you basics on how to get started editing your website.
If you are just beginning with Webflow, we highly recommend you to take Webflow 101 Crash Course, as this introductory course by Webflow University offers the overview of the basics and the most essential information you need to learn to get up and building your first Webflow website.
Webflow now supports MCP, which lets AI tools work directly with your site. Once connected, you can update this template by typing what you want instead of editing every page by hand.
For bigger changes, start a new chat with this prompt first. It helps the AI learn how this template is set up, so it works with what's already there.
"Review my Webflow site [your site name]. Check the color and font variables, class naming, components, and CMS collections. Give me a short summary. From now on, use the existing classes, variables, and components instead of creating new ones."
Content and style updates work best. Complex animations are easier to fine tune in the Designer. Always review changes before you publish.
This template utilizes the Webflow variables feature, allowing you to effortlessly modify all colors, which will be promptly updated across the entire site.
To adjust a color, navigate to the Variables panel, then choose the color you wish to modify.
In order to change the color of SVGs, Download .svg file from Assets and open it to any text editor. Change HEX color code with color of your choice and replace updated .svg file with the current file.
To adjust the font family, navigate to the Variables panel, then choose the font family you wish to modify.
If you want to change fonts, you can always go to Site Settings > Fonts. There, you will be able to upload custom fonts, use Google Fonts, or even connect your Adobe Fonts account.
Once you've uploaded a font from Site Settings, navigate to the Variables panel, then choose the font family you uploaded.
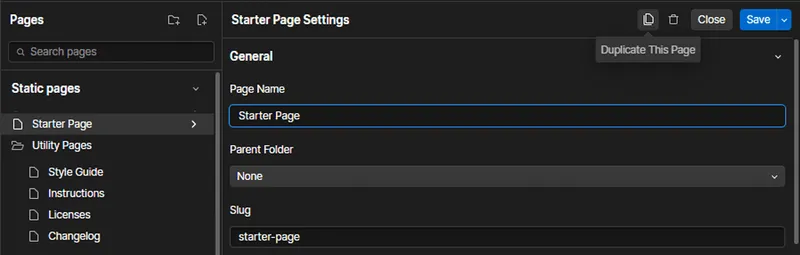
The “Starter Page” template provides a solid foundation for building your pages. It includes a pre-designed header, footer, and a blank section with a container to help you get started quickly.
Duplicate the Starter Page and start editing or adding sections from other pages.
This template uses Lenis to create a smooth, modern scrolling experience across all pages. Lenis replaces the browser’s default scroll behavior with a more fluid and refined motion, enhancing the feel of animations and transitions throughout the site.
This is handled entirely through custom code added in your Site Settings.
In Site Settings, scroll to the Custom Code → Footer (Before </body> tag) section and you'll see the initialization script:
<!-- Smooth scroll -->
<script src="https://unpkg.com/lenis@1.3.4/dist/lenis.min.js"></script>
<link rel="stylesheet" href="https://unpkg.com/lenis@1.3.4/dist/lenis.css">

<script>
// Lenis Smooth Scroll
const lenis = new Lenis({
  smooth: true,
  lerp: 0.1,
  wheelMultiplier: 1,
  infinite: false,
});

// GSAP + Lenis Connect
lenis.on('scroll', ScrollTrigger.update);

gsap.ticker.add((time) => {
  lenis.raf(time * 1000);
});

gsap.ticker.lagSmoothing(0);
</script>To disable the smooth scroll animation, go to Site Settings → Custom Code → Footer (Before tag) and remove the script added there.